Archive for the ‘Uncategorized’ Category
SSIS Tales From the Road Recording and Q&A
Hopefully you were able to attend my free webinar on 6/10/2014 about tips and tricks for implementing successful SSIS solution taken from real world client solutions. If you were unable to attend, the session was recorded and you can now watch it here.
There was time for Q&A at the end of the session, but we didn’t have time to answer all of the questions so I thought I’d answer them in a blog post.
Q: Could the file cache be used between packages in the same projects?
Yes, the ‘Use file cache’ option of the Cache Transform transformation can be used between packages that are in the same project or even different projects.
In order to do this, you’ll need to configure the Cache Transform with the ‘Use file cache’ option and execute the package. This is because the Cache Transform file (.caw extension) is created until the package is executed. Next, in another package that you want to reuse the Cache Transform file, add a Lookup transformation to a Data Flow Task. While configuring the Lookup transformation, select the ‘Cache Connection Manager’ connection type on the ‘General’ page. On the ‘Connection’ page, click ‘New’ to create a new Cache Connection Manager, select the ‘Use File Cache’ option and browse to the location where the file was created in the previous package. Configure the rest of the Lookup transformation just like you normally would and you are all set!
Q: Are Lookup Transformations better than just using Stored Procedures in the Source component?
If the connection for the source and the lookup are on the same database and correct indexing exists then a stored procedure in the source component that performs the join for you is probably the appropriate choice. However, if the source and the lookup connections are on different database servers or different file types altogether then the lookup transformation is one of only a few options available and is a highly efficient transformation if configured using the default settings.
Q: Could you please share the SSIS project and SSMS solution?
I’ve posted both solutions to my OneDrive. You can access them here.
Q: Go Bills! Go Sabres!
Great question 🙂
Another Option for Range Lookups in SSIS

The SSIS Lookup transformation is very efficient at looking up data flowing through the data flow pipeline to another data source. Often this transformation is used in data warehousing workloads to lookup the surrogate keys of dimensions in fact table processing.
Lookup Performance Constraint
A requirement to make this transformation fast is that column(s) flowing through the pipeline that are looked up to another data source must use an equi-join (ex: Pipeline.Column1 = Lookup.Column1). The tricky part is how to you handle scenarios where an equi-join doesn’t cut it and you need to use a range based comparison operator?
Get the tie-in to opening image? The field goal kicker, if he’s good, and unlike the player in the picture performs a range based lookup. He wants the ball to go between the range of the left post and the right post. Reach? Maybe, but I can’t resist tying technical topics back to sports!
Previous Solutions
Solutions to this problem have been previously written about, most notably the blog post “Lookup Pattern: Range Lookups” by Microsoft SSIS guru Matt Masson. In the blog post he outlines three approaches for range based lookups and compares the performance of each for a given data set. If you read the post, you obviously want to avoid the partially cached lookup transform unless your data set is very small. I’ve used the “Merge Join + Conditional Split” and “Script Component” approaches in the past and both have worked perfectly fine.
Problem
A client that I’ve been working with wanted to analyze various metrics by their own internally defined time segments that the transaction took place in. No problem here right, just use one of the previous solution options to lookup the surrogate key of the time segment dimension. Well this client had a particularly high volume of data, 10-15 million rows per day flowing through the data flow pipeline across several different fact table loads. Due to this, tight latency requirements, and my desire to always make things FASTER, I was searching for additional solutions to the range lookup problem.
Another Potential Solution
The solution that I came up with was to keep using the fully cached lookup transformation by changing the granularity of the lookup dataset to still allow an equi-join.
Pro tip, regularly use the phrases “change the granularity” and “partition elimination” to make yourself sound smarter than you really are!
I think the screenshot below drives home the concept of changing the granularity of the dimension. The Excel table on the left represents a simplified version of the client’s time segment dimension. One row per their definition of time segment which includes a range of times. The Excel table on the right represents the granularity of the time segment dimension that will allow for equi-join in the lookup transformation. One row per time segment per minute.

Now I don’t want to give the impression that I’m recommending changing the granularity of the data in the dimension itself (that most likely will cause plenty of other problems), just in the result set that is returned to the SSIS lookup transformation.
We can accomplish this through some T-SQL hotness with the assistance of a helper table. If your ranges are numbers, you’ll need a table containing one row per number between your min and max ranges. If your ranges are dates, you’ll need a table containing one row per date (I’m looking at you date dimension)! And in our scenario with time, we’ll need one row per minute (or hour or second if that is your requirement).
The SQL statements below create a sample time based helper table with a few rows of data, creates a sample time segment dimension with a few rows of data, and finally a query that uses the two tables to change the granularity of the result set to be one row per time segment per minute.
--Create minute helper table
CREATE TABLE #MinutesHelperTable
(
	HelperTime	TIME NOT NULL
)

--Insert few sample rows
INSERT INTO #MinutesHelperTable (HelperTime)
VALUES ('8:00:00'), ('8:01:00'), ('8:02:00'), ('8:03:00'), ('8:04:00'), ('8:05:00')

--Create sample time segment dimension
CREATE TABLE #MyTimeSegmentDimension
(
	SegmentKey  INT IDENTITY(1,1) NOT NULL
	, SegmentName VARCHAR(50) NOT NULL
	, BeginTime	TIME NOT NULL
	, EndTime	TIME NOT NULL
)

--Insert sample row
INSERT INTO #MyTimeSegmentDimension (SegmentName, BeginTime, EndTime)
VALUES ('Morning', '8:00:00', '11:59:00')

--Query to be used in SSIS Lookup transform
SELECT
	b.SegmentKey
	, a.HelperTime
FROM
	#MinutesHelperTable a
INNER JOIN
	#MyTimeSegmentDimension b
ON
	a.HelperTime BETWEEN b.BeginTime AND b.EndTime

Conclusion
This post outlines another option for range based lookups in SSIS that performs amazingly fast. With our very large data set the package run time was reduced from 24 minutes (script based range lookup patter) to 6 minutes, a 4x improvement!
 The worst range looker upper of all-time :(
Side Note
If your data doesn’t lend itself to using the solution I outlined, and you want to achieve the performance of the Script based solution outlined by Matt Masson but are overwhelmed .NET coding consider the Advanced Lookup Transform that is a part the Pragmatic Works Task Factory product (company guy!).
Working Offline with SSIS
The Work Offline feature within SSIS is critical for browsing or developing SSIS packages when one or more connection managers aren’t accessible. You can set this property either at the project of package level by selecting ‘Work Offline’ from under the ‘SSIS’ menu. Once the property is set SSIS will stop trying to validate connectivity to data sources and validating all the components within the package.

One problem that I’ve run in from time to time is that when opening an SSIS solution, the packages that were open the last time the project was saved automatically are opened and validated without giving you a chance to set the Work Offline property. If the previously developer had a lot of packages open, and with moderately complex packages you could have to wait a really, really, really long time before you are able to do anything.
Fear not, I have a workaround that I’ve used successfully from time to share. Navigate to the location where the project is stored and find the .dtproj.user file. The quick and dirty approach is to simply delete this file. The approach that takes ten seconds longer is to open file in notepad and set the value of <OfflineMode> to ‘true’.

Step 1: Find the .dtproj.user file

Step 2: Set the <OfflineMode> property to true
Note that if you have more than one project in your solution you potentially need to do this for all of the projects.
Piling on the Work Pile
My Pragmatic Work’s colleague Chris Schmidt recently recommended using the SSIS work pile design pattern to help me out with a challenging customer implementation. Chris did an excellent job outlining the design pattern in his blog post here: http://bit.ly/1iHzou5. I’ve had such amazing success with this solution that I wanted to touch on a few of the finer points of the implementation. Specifically, in this blog post I’ll discuss how to automate the population of the work pile.

Big Papi on Top of the Work Pile!
At the center of the work pile design pattern is a task queue that all of the SSIS package threads read from to determine what they should be working on. Once a SSIS package thread completes its work it picks another task from the task queue and does more work. This process continues until there is no more work to done. You can achieve massive scaling and parallelism by simply increasing the amount of SSIS package threads that run at the same time.
For simplicity and brevity, Chris’s blog post had a known set of files to populate into the work pile table. However, what do you do when the set of files isn’t known AND new files are always being pushed to different file system directories? I’ll show you how I handled this scenario in a recent implementation…
Getting Started
The first step is to create a table that will store the metadata of the file system directories that we are interested in searching for files to add to the work pile. In my scenario, I need to search several directories and each of the directories represent files that are pushed from different source systems. Also, each of the source systems name there files in different ways.
In the two T-SQL scripts below I create a table named dbo.TaskQueueDirectories to store the directory metadata and insert four sample directories, for four different source systems, that all have different file naming specifications.
1: CREATE TABLE [dbo].[TaskQueueDirectories]
2: (
3: [DirectoryID] [int] IDENTITY(1,1) NOT NULL,
4: [Directory] [varchar](200) NOT NULL,
5: [SourceSystem] [varchar](50) NOT NULL,
6: [FileSpec] [varchar](50) NOT NULL,
7: [Priority] [int] NULL,
8: CONSTRAINT [PK_TaskQueueDirectories] PRIMARY KEY CLUSTERED
9: (
10: [DirectoryID] ASC
11: )
12: )
1: INSERT INTO dbo.TaskQueueDirectories
2: (
3: Directory
4: , SourceSystem
5: , FileSpec
6: , [Priority]
7: )
8: VALUES
9: ('\\MyServer1\ETL\SourceSystem1', 'SourceSystem1', 'abc*.csv', 1)
10: , ('\\MyServer2\ETL\SourceSystem2', 'SourceSystem2', 'def*.csv', 2)
11: , ('\\MyServer3\ETL\SourceSystem3', 'SourceSystem3', 'ghi*.csv', 3)
12: , ('\\MyServer4\ETL\SourceSystem4', 'SourceSystem4', 'jkl*.csv', 4)
Now that the metadata is in place, the next step is to create an SSIS package that will loop through the directories, loop through the files in each directory that match the source system’s file specification, and compare that to our work pile table to see if the file already exists there. If it doesn’t exist in the work pile we’ll insert it, if it does exist we’ll skip it. Simple as that!
Finished Product
Let’s start at the final solution and work our way through the process. Below is a screenshot of the finished package that piles on the work pile!

SSIS Package Step 1- Find the Directories
The first step is to read in our dbo.TaskQueueDirectories and store it in an SSIS object type variable. I created a stored procedure named dbo.TaskQueueDirectories_Get which is executed in an Execute SQL Task. The results are stored in a variable named TaskQueueDirectories that has a data type of Object. I’m going to assume that you know how to configure the Execute SQL Task to based on this description. I will however give you DDL for the stored procedure:
1: CREATE PROCEDURE [dbo].[TaskQueueDirectories_Get]
2: AS
3:
4: SELECT
5: SourceSystem
6: , Directory
7: , FileSpec
8: FROM
9: TaskQueueDirectories
10: ORDER BY
11: Priority ASC
12: GO
SSIS Package Step 2- The Outer Loop
Next we simply use a For Each Loop task to loop through rows in the TaskQueueDirectories variable. The columns within each row are mapped to three new SSIS variables, SourceFileDirectory, FileSpec, and SourceSystem.


SSIS Package Step 3- The Inner Loop
Where are we now? We have the logic to loop through the directories, now we need the logic to loop through the files within the directory. To do this we’ll need one more For Each Loop task that utilizes the new variables we created in the previous step. First, make sure the enumerator is set to ForEach File Enumerator. Then create two new expressions on the Collection page, one for the Directory property which is set to the value in the SourceFileDirectory variable and another for the FileSpec property which is set to the value of the FileSpec variable. Finally, switch to the Variable Mappings page to store the name of the file in another new SSIS variable named SourceFileFullyQualified.


SSIS Package Step 4- Wrapping Up!
The final step! Here we need to determine if the file name that was found in the inner loop already exists in our work pile and insert it into the work pile if it doesn’t exist. Below is the DDL for my work pile table and a stored procedure to insert a row into the table if the file doesn’t already exist.
1: CREATE TABLE [dbo].[TaskQueue](
2: [TaskID] [int] IDENTITY(1,1) NOT NULL,
3: [SourceSystem] [varchar](50) NOT NULL,
4: [FilePath] [varchar](255) NOT NULL,
5: [Status] [tinyint] NOT NULL,
6: [Priority] [int] NULL,
7: [DateStarted] [datetime] NULL,
8: [DateCompleted] [datetime] NULL,
9: CONSTRAINT [PK_TaskQueue] PRIMARY KEY CLUSTERED
10: (
11: [TaskID] ASC
12: )
13: )
1: CREATE PROCEDURE [dbo].[TaskQueue_Insert]
2: (
3: @SourceSystem VARCHAR(50)
4: , @SourceFileFullyQualified VARCHAR(200)
5: )
6: AS
7:
8: IF NOT EXISTS
9: (
10: SELECT
11: 1
12: FROM
13: dbo.TaskQueue
14: WHERE
15: FilePath = @SourceFileFullyQualified
16: )
17: BEGIN
18: INSERT INTO dbo.TaskQueue
19: (
20: SourceSystem
21: , FilePath
22: , Status
23: )
24: VALUES
25: (
26: @SourceSystem
27: , @SourceFileFullyQualified
28: , 0
29: )
30: END
Finally, I’ll show you how the last Execute SQL Task is configured to execute the stored procedure and pass in the appropriate parameters:


What we’ve done here is pass the SSIS variable SourceFileFullyQualified, this is used to determine if the file already exists in the work pile. The second parameter is the variable SourceSystem, this is used to populate the dbo.TaskQueue.SourceSystem column if the file didn’t exist and a new row needs to be inserted.
Finishing Up
The last step is to schedule this bad boy to run on a given schedule, be it hourly, daily, or whatever meets your requirements. Enjoy!
SQL Server Partition Management Utility: Part 2
In Part 1 of this series of the free SQL Server Partition Management Utility we covered why and how to use the utility, and walked through a simple example where we executed the utility from the command line. In this post I want to show you how to execute the utility from SSIS.
Utilizing in SSIS
Let’s go through the same example as before where we want to load a new partition to the partition range to the SalesOrderHeader table. You probably now have a good idea how the SSIS package design needs to flow:
- Create staging table with no indexes
- Load newly created staging table
- Add indexes and constraints to staging table to match destination table partition
- Call the SWITCH command to move staging table to a new partition in the destination table
 And below is a screenshot of the corresponding package in SSIS (I’m firmly in the not a fan group of the VS2012 color theme or lack thereof I suppose you could argue!).
The Execute Process Tasks with the task naming convention prefix “EPT” will handle calling the utility’s executable.

Figure 1: Control flow view of package
 However, I am a huge fan of project parameters in SSIS 2012, so let’s create a few to make our lives easier. For clarity, I’ve prefixed all the parameters with “partmgmt”. The first five parameters contain the values for the five different commands that the executable handles. I specifically stored them in parameters because I kept forgetting what they were and had to keep jumping back and forth between the solution and the documentation. The final parameter partmgmt_Executable stores the file path of the ManagePartition executable.

Figure 2: Project parameters
One last configuration step, the creation of variables to store the arguments to pass to the ManagePartition executable. We’ll need to pass the database, schema, and table names of the destination partitioned table. Also, we’ll need the name of the staging table, and the partition range value which will be used to create the staging table on the correct filegroup and to create the check constraint.
Homework: You’ll need to figure out the most appropriate way to set the partmgmt_PartitionRangeValue variable for your solution.

Figure 3: Variables
In order to call the ManagePartition executable from SSIS, we’ll use the Execute Process Task. On the Expressions page I’ve created two expressions, one for the executable to be called and one for the arguments to be passed to the executable (shown in Figure 4). The Executable expression simply uses the partmgmt_Executable project parameter. Figure 5 shows the expression used for the arguments which relies purely on the project parameters and variables that we’ve already defined.
Short recap of the arguments:
- /C switch is the command to be executed
- /d switch is the database name of the partitioned table
- /s switch is the schema of the partitioned table
- /t switch is the table name of the partitioned table
- /A switch is the name of the staging table
- /v switch is the value of the partition range to be loaded into the partitioned table

Figure 4: Expressions for Execute Process Task

Figure 5: Full detail of Arguments expression for CreateStagingNoIndex
Now that we’ve created staging table Test1 for the partition range value of 07/31/2009, the next step would be to load the staging table with a data flow task. I’ll assume you already understand how that works so I’ll just show you the source query used in the data flow task to load our dummy record which uses the DATEADD function to add a year to the OrderDate, DueDate, and ShipDate for one record in the SalesOrderHeader table that has the highest OrderDate.

Now we are ready to add the necessary objects to the staging table so that it meets the requirements of the SWITCH operator. Because we spent the time to properly configure our project parameters and variables, we can use the previous Execute Process Task as a template and just modify the Arguments expression to use a different project parameter (partmgmt_Command_IndexStaging) for the /C or command switch.

Figure 6: Full Detail of Arguments expression for IndexStaging
We are now ready for the final step of the process, switching the staging table into the destination partitioned table. The syntax for the T-SQL statement is:
ALTER TABLE <StagingTableName> SWITCH TO <DestinationPartitionedTable> PARTITION <PartitionNbr>
We already have variables for <StagingTableName> and <DestinationPartitionedTable>, but are missing <PartitionNbr>. Let’s add a new Execute SQL Task to the beginning of our package that queries the $PARTITION system function and supplies the partition range as a parameter to return the partition number like so:

Figure 7: SQL Statement to get partition number
Add our partition range value parameter like so:

Figure 8: Pass in partition range value variable to parameter
Store the result of the query to our partition number variable like so:

Figure 9: Set result of query to partition number variable
Ok, now we have all the elements we need to construct our ALTER TABLE SWITCH statement! This time I decided to use an expression on a variable to construct the SQL statement that is executed by the Execute SQL task named “SQL SWITCH Partition”. Here is a look at the expression:

Recap
Now you have a pattern that you can use to incorporate the SQL Server Partition Management Utility into your SSIS ETL processes. Have fun designing!
SQL Server Partition Management Utility: Part 1

In all of the SQL Server environments I’ve worked in over the last 8 years since SQL Server 2005 was released I’ve seen first hand that table partitioning isn’t used frequently enough. Now, don’t get me wrong I think most SQL Server professionals are very aware of the feature and its benefits. However, I believe database developers are actually paralyzed by everything they need to consider to design an effective solution utilizing partitioning.
One of the benefits of table partitioning is that it allows you insert data into a very large table as fast as possible. This is accomplished by first loading data into a staging table that has the same structure as the destination table. Assuming a list of requirements on the staging table is met, you can then use ALTER TABLE with the SWITCH option to move the data in the staging table into a partition in the destination table. The switch happens in the blink of an eye as it is a metadata only operation.
So database developers need to know what requirements must be met on the staging table before figuring out how to automate loading data into a partition table using the SWITCH pattern.
- The staging table must have the same column structure as the partitioned table
- The staging table must have the same indexes
- The staging table must have the same constraints
- The staging table must have the same filegroup as the target partition of the partitioned table
- The staging table must have a check constraint to ensure the data fits into the target partition of the partitioned table
Meeting these requirements isn’t the hardest thing to accomplish, but it isn’t all that trivial either, especially if have an environment where table structures are changing due to new development or index tuning. One approach to handle this is to store the DDL for each partitioned tables’ table structure, indexes, and constraints and utilize them in your ETL packages. With this approach, for every DDL change that you are aware of you have to change your ETL to accommodate the change. And for changes that you don’t know about (how could that ever happen)? Well, you’ll find out soon enough from a failed ETL run.
But don’t worry, as the subject of this blog post suggests there is a free utility to help you with the dirty work!
The Utility

The SQL Server Partition Management project on CodePlex is that utility. It provides several commands that allow you to control the automation process to create the staging table while ensuring that it meets all of the requirements of the SWITCH operator that we previously outlined. The utility determines the database structures that need to be built based on the arguments passed to the utility.
On the Downloads page of the CodePlex project the ManagePartition.exe is the executable that does all the work. It is executed from either the command line or through SSIS. In part two of this series I’ll cover in detail how to use this utility in SSIS.
The ReadMe.htm file is also available on the download tab and contains very good documentation for the executable (confusingly the CodePlex documentation tab is empty).
The third and final download available is named PartitionManagement3.0.zip. This contains all of the source code should you choose to extend the solution as you see fit as well as SQL test scripts.
Pre-reqs
Make sure that you have the required pre-requisites called out in the readme file with download links. You will need the .NET Framework 3.5 or higher, SQL Server 2012 System CLR Types, AND SQL Server 2012 Management Objects (SMO).
Commands
The ManagePartition executable accepts five different commands that assist you with creating your staging table to meet the requirements for the SWITCH operator. The two commands that I typically use, and will focus on for the rest of this post are CreateStagingNoIndex and IndexStaging. CreateStagingNoIndex pretty much does what it sounds like, it creates a staging table with the same structure as the specified destination table without any indexes (clustered or nonclustered) so that you can load the staging table as fast as possible. You can probably also guess what the IndexStaging command does, it creates any indexes or indexed views, and the check constraints for the partition number or range value specified. The three other commands available are outlined below:
- ClearPartition– Switches out a partition in a partitioned table to a staging table.
- CreateStagingFull– Creates a staging table that matches a partition of a partitioned table in terms of structure, indexes, constraints, and filegroup.
- CreateStagingClusteredIndex– Creates a staging table that matches a partition of a partitioned table in terms of structure, the clustered index, and filegroup. Nonclustered indexes will not be created.
Arguments
I’m not going to cover all of the arguments available but the table below outlines the more important arguments. However, be aware that there is also functionality to connect without using integrated security by providing a SQL Server login and password and to script the objects to be created without executing them on the server.
| Argument | Short Form | Description |
| /Command | /C | The utility command to be executed |
| /Database | /d | The name of the database |
| /Schema | /s | The schema name of the partitioned table |
| /PartitionTable | /t | The name of the partitioned table |
| /PartitionNumber | /p | The number of the target partition in the partitioned table |
| /PartitionRangeValue | /v | The range value corresponding to the target partition in the partitioned table |
| /StagingTable | /A | The name of the staging table to be created |
Testing
The provided testing script PartitionMgmtTest_2012.sql in the PartitionManagement3.0.zip creates a database named PartitionTest by copying some objects and data from the AdventureWorks2012 database. Note, that the script does attempt to drop views before they exist so don’t be surprised when you see errors when running the script. Also, the entire script isn’t meant to be executed in one batch. Do a CTRL+F and search for the string ‘ManagePartition tests’. Execute everything above this line first to create the database. Everything below the line is the test cases.
Hands On with the Utility
Why should I use it, check. Background info, check. Let’s see it in action!
Our scenario is that we want to load the partition corresponding to the partition range value of 01/01/2007 for the SalesOrderHeader table. This table has a primary key, foreign keys, indexes, check constraints, and default constraints that are staging table must exactly match before using the SWITCH operator.
The first thing we’ll do is run the ManagePartition executable with the command CreateStagingNoIndex with the appropriate arguments as shown below to create our staging table named Test1.
![]()
The command executes in just a few seconds and we no have a staging table with no indexes or constraints that we can bulk insert data into very fast. We’ll pretend we accomplished that task and are now ready to make sure the table meets all the requirements of the SWITCH operator. We’ll do that by using the IndexStaging command as shown below:
![]()
Notice the only difference between the two commands we just executed was the /C argument which specifies the command to be run, everything else stays the same…pretty simple! So how do we verify that it worked as advertised? Let’s first browse the two tables in SSMS object explorer and eyeball the keys, constraints, and indexes.

BOOM! Exact match, even the Columnstore index! What is the extra constraint chk_Test1_partition_4 on our staging table you ask? No worries, this is check constraint to meet our last requirement that enforces the data in our table to match the partition range for our specified partition range value. And the definition of the check constraint:

One last test, lets make sure we can successfully execute the SWITCH operator. Since we cheated before and never actually loaded any data into the staging table and the fact that our partitioned table already has data for the partition range specified what we’ll do instead is first SWITCH the partition out of the partitioned table and into the staging table and the SWITCH the partition back into the partitioned table from the staging table.
First, the screenshot below shows the SWITCH out of the partitioned table and into the staging table. Also, notice that querying the staging table now returns data!

And finally, we SWITCH the staging table into the partitioned table. Querying the staging table now returns no data as expected.

Recap
Now that I showed you how you can use the SQL Server Partition Management Utility to ease the pain of creating staging tables that will meet the requirements of the SWITCH operator you are running out of excuses for implementing partitioning in your environment…try it out!
In part 2 of this series I’ll show you how to use the utility within SSIS, stay tuned ![]()
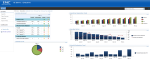
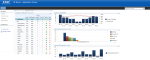
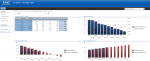
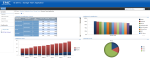
Latest Project Screenshots
Here are some screenshots of a Business Intelligence for Infrastructure solution which provides a holistic view of a clients’ infrastructure, KPI based indicators, and interactive web parts for further analysis. The solution is built upon the latest Microsoft Business Intelligence product offerings including SharePoint 2010, PerformancePoint 2010, and SQL Server 2008 R2.
Data Modeling Techniques for DW
I just came across two data modeling techniques that I’ve never heard of before through a TDWI group discussion on LinkedIn called DataVault and Anchor Modeling.
LinkedIn Discussion: http://www.linkedin.com/groupAnswers?viewQuestionAndAnswers=&gid=45685&discussionID=12339477&goback=%2Eanh_45685
DataVault: http://www.datavaultinstitute.com/
Anchor Modeling: http://www.anchormodeling.com/
Anchor Modeling White Paper: http://syslab.dsv.su.se/profiles/blogs/best-paper-award-at-er09-for
Everything 2010 VM
This download contains a two Virtual Machine set for evaluating and demonstrating Office 2010 and SharePoint 2010
SQL Server 2008 R2 Update for Developers Training Kit
I just downloaded the SQL Server 2008 R2 Update for Developers Training Kit! It contains videos, presentations, demos, and hand-on labs about new SQL Server 2008 and SQL Server 2008 R2 functionality.
Make sure to check out the AdventureWorks Racing All-Up SQL Server 2008 Demo that I saw at the PASS Summit!
Download it here…
http://tinyurl.com/ydcm55f
