Posts Tagged ‘SSIS’
Working Offline with SSIS
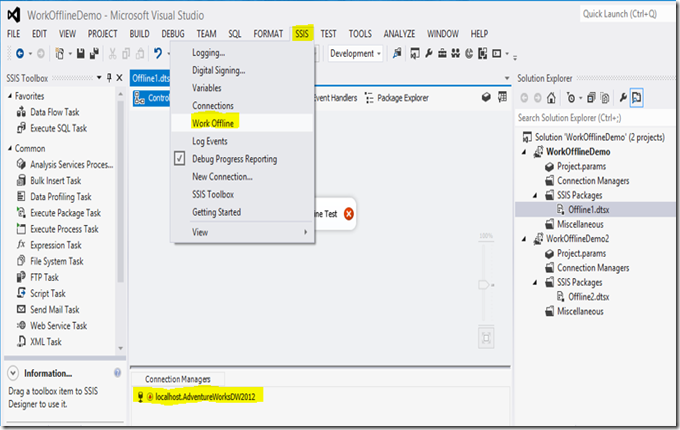
The Work Offline feature within SSIS is critical for browsing or developing SSIS packages when one or more connection managers aren’t accessible. You can set this property either at the project of package level by selecting ‘Work Offline’ from under the ‘SSIS’ menu. Once the property is set SSIS will stop trying to validate connectivity to data sources and validating all the components within the package.
One problem that I’ve run in from time to time is that when opening an SSIS solution, the packages that were open the last time the project was saved automatically are opened and validated without giving you a chance to set the Work Offline property. If the previously developer had a lot of packages open, and with moderately complex packages you could have to wait a really, really, really long time before you are able to do anything.
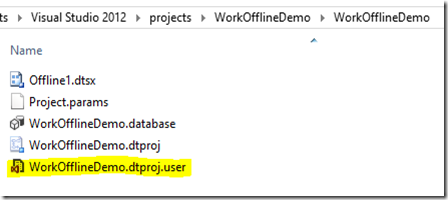
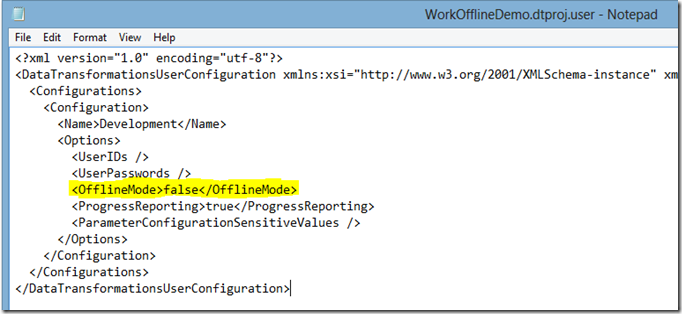
Fear not, I have a workaround that I’ve used successfully from time to share. Navigate to the location where the project is stored and find the .dtproj.user file. The quick and dirty approach is to simply delete this file. The approach that takes ten seconds longer is to open file in notepad and set the value of <OfflineMode> to ‘true’.
Step 1: Find the .dtproj.user file
Step 2: Set the <OfflineMode> property to true
Note that if you have more than one project in your solution you potentially need to do this for all of the projects.
SQL Server Partition Management Utility: Part 2
In Part 1 of this series of the free SQL Server Partition Management Utility we covered why and how to use the utility, and walked through a simple example where we executed the utility from the command line. In this post I want to show you how to execute the utility from SSIS.
Utilizing in SSIS
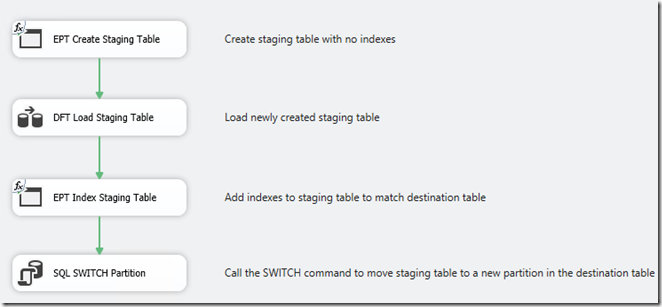
Let’s go through the same example as before where we want to load a new partition to the partition range to the SalesOrderHeader table. You probably now have a good idea how the SSIS package design needs to flow:
- Create staging table with no indexes
- Load newly created staging table
- Add indexes and constraints to staging table to match destination table partition
- Call the SWITCH command to move staging table to a new partition in the destination table
 And below is a screenshot of the corresponding package in SSIS (I’m firmly in the not a fan group of the VS2012 color theme or lack thereof I suppose you could argue!).
The Execute Process Tasks with the task naming convention prefix “EPT” will handle calling the utility’s executable.
Figure 1: Control flow view of package
 However, I am a huge fan of project parameters in SSIS 2012, so let’s create a few to make our lives easier. For clarity, I’ve prefixed all the parameters with “partmgmt”. The first five parameters contain the values for the five different commands that the executable handles. I specifically stored them in parameters because I kept forgetting what they were and had to keep jumping back and forth between the solution and the documentation. The final parameter partmgmt_Executable stores the file path of the ManagePartition executable.
Figure 2: Project parameters
One last configuration step, the creation of variables to store the arguments to pass to the ManagePartition executable. We’ll need to pass the database, schema, and table names of the destination partitioned table. Also, we’ll need the name of the staging table, and the partition range value which will be used to create the staging table on the correct filegroup and to create the check constraint.
Homework: You’ll need to figure out the most appropriate way to set the partmgmt_PartitionRangeValue variable for your solution.
Figure 3: Variables
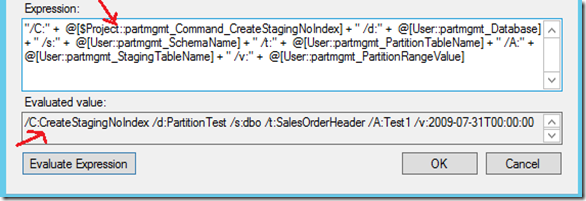
In order to call the ManagePartition executable from SSIS, we’ll use the Execute Process Task. On the Expressions page I’ve created two expressions, one for the executable to be called and one for the arguments to be passed to the executable (shown in Figure 4). The Executable expression simply uses the partmgmt_Executable project parameter. Figure 5 shows the expression used for the arguments which relies purely on the project parameters and variables that we’ve already defined.
Short recap of the arguments:
- /C switch is the command to be executed
- /d switch is the database name of the partitioned table
- /s switch is the schema of the partitioned table
- /t switch is the table name of the partitioned table
- /A switch is the name of the staging table
- /v switch is the value of the partition range to be loaded into the partitioned table
Figure 4: Expressions for Execute Process Task
Figure 5: Full detail of Arguments expression for CreateStagingNoIndex
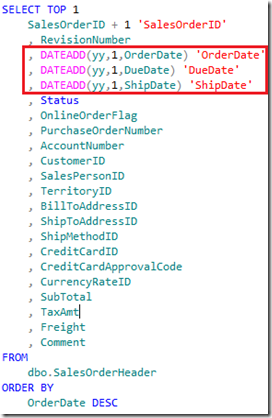
Now that we’ve created staging table Test1 for the partition range value of 07/31/2009, the next step would be to load the staging table with a data flow task. I’ll assume you already understand how that works so I’ll just show you the source query used in the data flow task to load our dummy record which uses the DATEADD function to add a year to the OrderDate, DueDate, and ShipDate for one record in the SalesOrderHeader table that has the highest OrderDate.
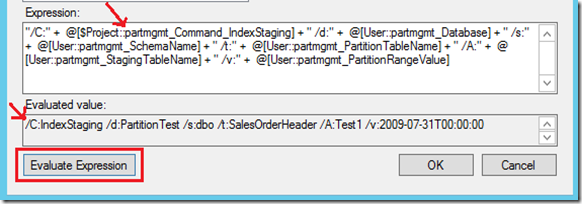
Now we are ready to add the necessary objects to the staging table so that it meets the requirements of the SWITCH operator. Because we spent the time to properly configure our project parameters and variables, we can use the previous Execute Process Task as a template and just modify the Arguments expression to use a different project parameter (partmgmt_Command_IndexStaging) for the /C or command switch.
Figure 6: Full Detail of Arguments expression for IndexStaging
We are now ready for the final step of the process, switching the staging table into the destination partitioned table. The syntax for the T-SQL statement is:
ALTER TABLE <StagingTableName> SWITCH TO <DestinationPartitionedTable> PARTITION <PartitionNbr>
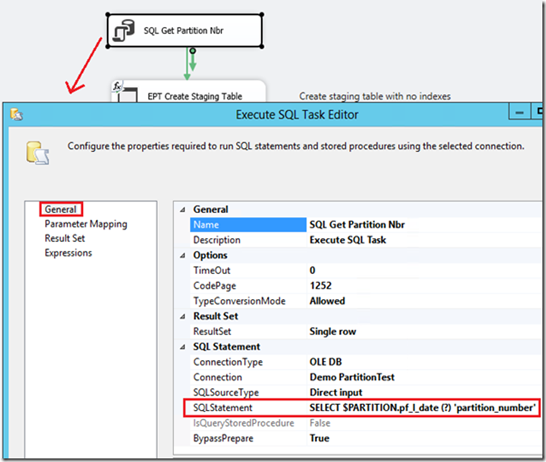
We already have variables for <StagingTableName> and <DestinationPartitionedTable>, but are missing <PartitionNbr>. Let’s add a new Execute SQL Task to the beginning of our package that queries the $PARTITION system function and supplies the partition range as a parameter to return the partition number like so:
Figure 7: SQL Statement to get partition number
Add our partition range value parameter like so:
Figure 8: Pass in partition range value variable to parameter
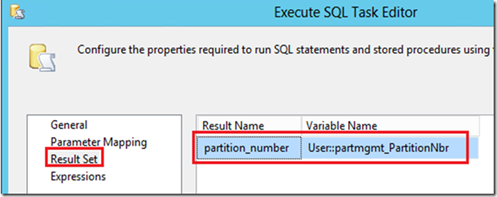
Store the result of the query to our partition number variable like so:
Figure 9: Set result of query to partition number variable
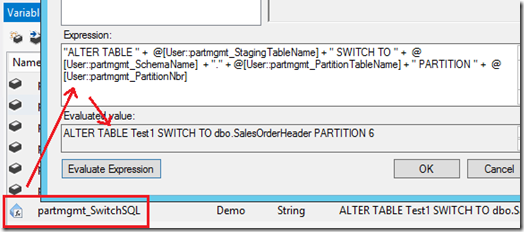
Ok, now we have all the elements we need to construct our ALTER TABLE SWITCH statement! This time I decided to use an expression on a variable to construct the SQL statement that is executed by the Execute SQL task named “SQL SWITCH Partition”. Here is a look at the expression:
Recap
Now you have a pattern that you can use to incorporate the SQL Server Partition Management Utility into your SSIS ETL processes. Have fun designing!
